Contributed by:
10k
Submitted:
Images archived: 2001
Preparing the clones for aero tub cloning
The following information applies to all types of
aero cloners, not just the cheapo-aero tub.
There are a few things that need to be done in
order to get the best results when aero cloning.
Preparing the
future cuttings
before
they're cut from the donor plant. Followed by
final trimming, soaking, leaf trimming and lastly,
cutting to length and loading the cloner.
Prepare the mom... 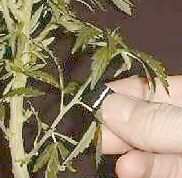
Before cutting the cuts from
the donor, hold a support tube next to the future
cutting and determine whether or not any nodes will be
inside of the support tube. If there are any nodes in
that area, trim them flush to the stem with a cuticle
nipper or similar tool. Do the same for all the growth
tips you plan on taking for this batch of clones. Allow
the trimmed mom to heal up overnight before you actually
take the cuttings off the donor. This step will keep the
cuts from trying to make roots inside of the tubes, and
will help prevent stem rot within the support tubes.
Take the cuttings the following
day... 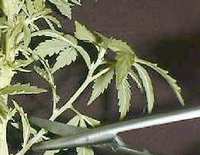
Cut them a little longer for
now, using a sharp scissors or razor blade.
Trim away the
nodes... 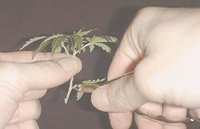
Trim any nodes from the portion
of the stem that will be below the support tubes. Af
uses a cuticle nipper for this task and cut them flush
to the stem.
Soak all
the trimmed cuttings in cool water... 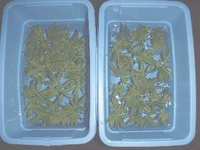
Allow all the cuts to soak for
at least a half hour in cool tap water. The water soak
will get all the cuttings nice and turgid, and the
chlorine in the tap water will help sterilize the
cuttings.
Trim the leaf
blades... 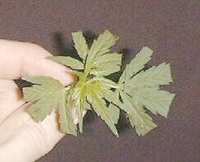
Cutting the blades in half as
shown will cut moisture loss in half. This leaf trimming
will also help to slow down premature yellowing caused
by too much or too intense lighting.
Load em
up... 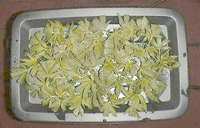
Load the finished cuttings into
the support tubes in the lid and cut the stems to length
with a razor blade. You want the stems to hang about one
inch below the tubes. While you are loading the tub, the
air pump should be running to start the wetting process,
let it run for about an hour before you set up the air
pump on the timer.
Use the timer
please... Cycle the timer on and off with the
timer set for 30 minutes on by 60 to 90 minutes off
(depending on the environment).
About that
little heater... The six dollar 7-1/2 watt
fishbowl heater has no thermostat. It must be connected
to the same timer you'll be running the air pump, using
a two prong multi-tap adapter in the timers socket,
otherwise the heater will overheat the water. If you are
building your own cheapo and can find a small fully
submersible heater with thermostatic control, I highly
recommend buying and using that instead of the cheap
little heater. In some situations and in warmer rooms,
running a heater may not be necessary. Walmart has a
cheap little two dollar thermometer which can be left
floating in the tub for checking the water temperature.
Misting and/or a dome... You may need
to mist the cuttings once or twice the first day, but
from then on they should not need any more misting. If
you have a very dry environment (low rh) you can place a
large plastic bag over the entire tub to maintain a
higher humidity.
No nutes ! Use only
distilled water or tap water in the cloner.
Do not
add any ferts to the water, it will only cause fungus
problems and failed clones due to stem rot from the
fungus.
For impossible strains only...
If you have a really hard to clone strain (like big
bud), you can add one tespoon of dip-n-grow liquid per
half gallon of water and run it for the first twelve
hours.
Change to straight ph'd water after the first
twelve hours.
Change the water...
Always change the water in the cloner daily for the
first few days. This will help keep the cloner and
cuttings clean.
Never use intense lighting
for cloning... You want the flourescent lighting
to be a foot or two away from the top of the tub. Closer
or more intense lighting will cause premature yellowing
and failures.
ph the water... Keep
the water in the tub ph'd to a range between 5.0 and
6.0. Higher ph will cause failures. Use phosphoric acid
to lower the ph.
Water temperature...
Keep the water temperature between 75f and 80f.
Higher temps will cause fungus, lower temps will
cause stasis, stalled or failed clones.
Be
patient...roots will develop soon... 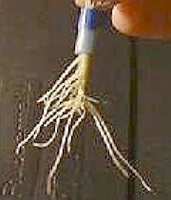
The best part of aero cloning
is the satisfaction of seeing the roots develop. Some
strains will start rooting as fast as five days, others
will take as long as two weeks. Most will at least show
root bumps starting within one week, with roots blasting
out a few days after the bumps. Remember though, that a
clone showing root bumps is ready for transfer to a
hydro medium or system where it can start receiving weak
nutes.
Aero rooted clones
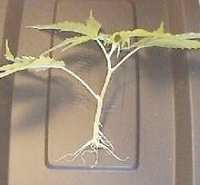
are perfect for transplanting
directly into grow rocks or lava rock in hydroponic
systems like ebb & flow or deep water culture. They
are also suitable for soil growing if they are
transplanted properly at the right stage of rooting.
Happy cloning,
10k


