Contributed by:
ngc7579
Submitted: September 16th, 2003
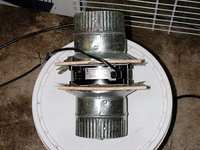
I used a
Comair MX2A4 115cfm A/C fan for this project. I bought
it at Grainger (was about $30).
I took a few scraps of 1/4 sheeting I
had laying around and popped a 4" hole in each with a
hole saw. Most any piece of scrap wood works for this -
it doesn't have to be 1/4 inch.
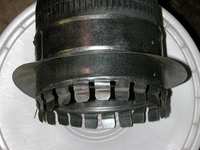
Get two 4" tab
collars. Tab collars are intended to be used on material
~3/4" in thickness - use a pair of tin snips to extend
the tab cuts. See tab1.jpg and tab2.jpg for before/after
shots. Note that the tab collar in the photos is a 6"
version - I didn't have another 4" laying around.
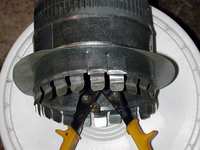
Place the tab collar in the 4" hole
you drilled in step 1 and fold the tabs back. Repeat for
second tab collar. Use a pair of leather work gloves
when folding those tabs back - once you cut those tabs
with the snips, they become *real* sharp.
Stack the two tab collars and the fan in the final
position, then using your drill and 3" sheet rock screws
tighten things up. The sheet rock screws will go through
that tab collar like butter, so make sure your finger
isn't lined up with that screw when you put it in!.
Attach the inline fan assembly to your
light and exhaust ports. Note: I had previously modified
that light hood as outlined in my sig.
All of
these fans require you to buy a "pigtail". See "Optional
Accessories" below item on each page. Avail in diff
lengths and 45 or 90 degree heads, but they really
aren't optional. They avg about $1.50.


