GrowFAQ:

What is an Aerospring and how do I build one?

  Added by: MedMan  Last edited by: MedMan  Viewed: 720 times   Rated by 17 users: 7.11/10
Contributed by: Contagis


The "Aerospring Aeroponic Garden" is a kit now being sold by FutureGarden.com. Its a simple aeroponic system ready to go once set-up. I was building my own aero system a while ago and ended up buying their 
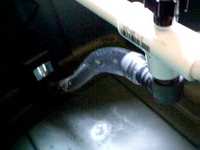
kit. While putting it all together I came across a problem or two and have workarounds here. The system is pretty simple and you can put it together in a few 
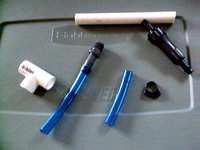
minutes. This is the parts list from FutureGardens website:

- (8) Grow sites with baskets
- (4) Grow site plugs
- Reservoir level indicator
- High performance mag drive pump
- LECA stone growing media
- 16oz. Above & Beyond starter kit (Vigor, Grow & Bloom)
- Tubing and garden hose fill/drain adapter
- Measures 32"x 20" x 17" tall
- Full color instructions
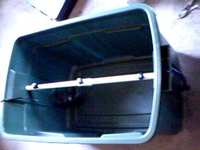
Here is the finished system.


Here are some of the main parts. The blue tubing doesn't fit over the RIO1100 pump.


I found some clear tubing at Home Depot which fits nicely over the pump, I also needed a half inch tube connector that attaches to the PVC ? it?s where all the small PVC parts are.


This is the manual diagram.


DIY Aerospring part-list:

- Reservoir
- Net cups
- 1/2" threaded PVC "T" Fitting
- 1/2" PVC Pipe
- Weather Stripping
- Pump
- Misters or sprayers
- Clamps
- 1/2" adapter to connect to one end of the tubing and the other to a hose to easily drain the system
- 1/2" End Cap
- A barbed adapter that has a 1/2" threaded side to go into the PVC T fitting in the other end-- make sure it fits the tube that is coming from the pump
- A drill bit for your misters and sprayers
- A 1/2" hole saw for the PVC holes and another (size dependant on type of cup) for your netcups.


DIY Aerospring building instructions:

Cut two pieces of 1/2" PVC to be a little longer than the length of your reservoir. Like the diagram, the threaded PVC fitting goes in the middle. Cut two 1/2" holes at each end so the PVC sticks out on one end, put the end cap on the other hose adapter. In the middle of the T fitting drill a hole for one mister and at each end another hole for the other two misters-- if you have more misters just line them up evenly and drill the hole. Wrap the bottom of the misters with Teflon tape and screw them in so they fit snugly. Under the T fitting, screw in the barbed adapter and put the tubing on it, then place the pump in the reservoir and connect the other end of tube to the pump.

The Aerospring has a level line that helps nutrient monitoring, its 1/2" blue tubing running up the side of the reservoir from the bottom. To make this you need a 1/2" tube grommet, a 1/2" barbed "L" fitting, a clamp and some tubing. Just drill a hole near the bottom and one threw the handle of your reservoir, place the grommet in the hole at the bottom and then place the L fitting threw it. Connect the tube, then put it threw the hole at the handle for support. Use some silicone and Teflon tape to make the seal waterproof. To finish, run weather stripping along the top of the reservoir, but not where the handles go. Silicone can be found at any pet supply store and the Teflon at HomeDepot

  Last modified: 19:41 - Feb 20, 2002  


faq:1219 "What is an Aerospring and how do I build one?"