Added by:
MedMan Last edited by:
10k Viewed: 596 times
Rated by 1 user:
8.00/10
How do I install a
GFCI?
Contributed By: Contagis
Required items:
1. GFCI Tester
2. Wire Connectors (Those caps that are red yellow
blue etc...) 3. Flat and Phillips head screw
drivers. 4. Insulated needle nose pliers.
This is how my outlet was set-up. It was simple
in the middle of two other outlets as it had two main
wires; each had its own power, neutral and ground (6
wires in total). I tested the GFCI tester on the outlet
-- it has three lights on it. The two yellow lights lit
up and the red stayed off. Using the installation chart
provided indicated that the outlet was working fine.
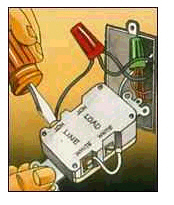
Turn off the power at the main service panel,
and confirm that the circuit is de-energized by using a
voltage tester (voltmeter). Remove the faceplate. Take
the power and neutral from one main wire, make sure they
are from the same main wire and leave the ground
connected to the outlet. Put a cap on each wire, and go
back to the breaker box and turn it on. Now put the
tester back in and see if there is still power going to
it. If power is still going to the outlet, the two wires
that you capped should be labelled LOAD. If no
power is there the capped wires should be labelled
LINE.
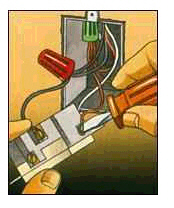
Look at the back of your GFCI, find
where it says LINE and connect the white wire from the
LINE cable you capped or labelled and connect it to the
white terminal (SILVER SCREW) on the GFCI. Now connect
the black LINE wire to the other side of the GFCI LINE
terminal (BRASS SCREW). Ensure that the LINE wires you
connected are on the LINE terminals of the GFCI. My
outlet had two main wires, so I have another set to
connect -- simply do the same with the LOAD wires on the
GFCI, white wire to silver/white terminal and black to
brass/hot terminal. After the wires are connected
REMEMBER TO CONNECT THE GROUNDS. They must be attached
under a screw that is on the top or bottom of the GFCI
depending how you look at it.
Contributed
By: Flowerman
If you install a GFCI in the
middle of a circuit to protect additional receptacles
down the line, be aware that the more receptacles any
one GFCI protects, the more susceptible it is to
"phantom tripping" -- shutting off the power because of
tiny, normal fluctuation in current flow.
1.
Turn off the power at the main service panel, and
confirm that the circuit is de-energized by using a
voltage tester (voltmeter). Remove the old receptacle.
Pigtail all the white neutral wires together, and
connect the pigtail to the terminal marked WHITE LINE on
the GFCI.
2. Pigtail all the black hot wires
together, and connect them to the terminal marked HOT
LINE on the GFCI.
3. Connect the grounding wire to the
green grounding screw terminal on the GFCI. Mount the
GFCI in the receptacle box, and reattach the cover
plate. Restore power at the service panel, and test the
GFCI according to the manufacturer's instructions.